Growing up, making treats in the kitchen was magical. It turned simple days into special ones. Chocolate peanut butter rice krispie treats bring back that joy.
These no-bake desserts are more than treats. They’re a trip back in time. They mix chocolate and peanut butter with rice krispies’ crunch. It’s a dessert that’s easy to make but tastes amazing.
Whether you’re new to baking or have been doing it for years, this recipe is for you. It shows how to make a treat that everyone will love. You’ll see how simple it is to make these no-bake desserts that everyone will want more of.
Understanding the Magic of Chocolate Peanut Butter Rice Krispie Treats
Sweet snacks hold a special spot in our hearts. Rice krispies recipes bring joy and nostalgia to kitchens. They mix flavors and textures that everyone loves.

Why This Combination Works
Peanut butter treats are a mix of sweet and salty. Adding chocolate and crispy rice makes them a unique dessert experience.
- Creamy peanut butter adds rich, smooth texture
- Chocolate provides deep, indulgent sweetness
- Rice krispies deliver satisfying crunch
Benefits of No-Bake Desserts
No-bake desserts like rice krispies are super convenient. They need little kitchen skill and almost no cooking time.
- Quick preparation
- No oven required
- Minimal cleanup
- Kid-friendly recipe
Perfect Occasions for These Treats
Chocolate peanut butter rice krispie treats are great for many events. They fit well in different settings.
- Potluck parties
- Children’s birthdays
- Family movie nights
- Casual dessert sharing
Discover the magic of these irresistible sweet snacks that bring smiles and memories to life!
Essential Ingredients for Perfect Rice Krispie Treats

Making delicious kid-friendly desserts begins with the right ingredients. These classic treats need a few key parts to turn simple ingredients into magical gooey treats. Everyone will love them.
Your core ingredients are crucial for making irresistible rice krispie treats. Let’s look at the essential elements:
- Crispy Rice Cereal: Pick a high-quality brand with few ingredients. Choose cereals that stay crunchy and are perfect for your treats.
- Marshmallows: They bind everything together, making those gooey treats. Use fresh, soft marshmallows for the best texture.
- Butter: It adds richness and prevents sticking. Use unsalted butter for better sweetness control.
For the chocolate peanut butter version, you’ll need more ingredients:
- Semi-sweet chocolate chips (50-60% cacao recommended)
- Creamy or crunchy peanut butter
- Optional honey for extra binding
Quality is key when picking ingredients. Fresh, premium ingredients make these kid-friendly desserts go from good to amazing. Choose natural peanut butter without added sugars and high-quality chocolate chips that melt well.
Pro tip: Always check ingredient freshness and store them properly to maintain optimal flavor and texture.
By carefully choosing each ingredient, you’ll make rice krispie treats that are more than just desserts. They become memorable culinary experiences that make everyone smile.
Kitchen Tools and Equipment Needed
Making chocolate peanut butter rice krispie treats needs the right tools. Having everything ready before you start makes it fun. Let’s look at the key utensils and equipment for these tasty snacks.
Essential Utensils for Perfect Cereal Treats
- Large mixing bowl (preferably glass or stainless steel)
- Rubber spatula for mixing
- Measuring cups and spoons
- Wooden spoon
- Cooling rack
Pan Size and Type Recommendations
Choosing the right pan is key for the perfect treat thickness. A 9×13 inch baking pan is ideal for even treats.
| Pan Type | Recommended Use | Best For |
|---|---|---|
| Glass Baking Dish | Even heat distribution | Thick, uniform treats |
| Metal Baking Pan | Quick cooling | Crisp edges |
| Non-stick Pan | Easy removal | Clean cutting |
Optional Tools for Professional-Looking Results
For better treats, try these extra tools:
- Parchment paper for easy removal
- Offset spatula for smooth pressing
- Kitchen scale for precise measurements
- Decorative cutting tools

Pro tip: Always line your pan with parchment paper or butter. This prevents sticking and ensures perfect treats every time.
Preparing Your Workspace and Ingredients
Making no-bake desserts like chocolate peanut butter rice krispie treats needs careful prep. Get your workspace and ingredients ready before you start. This makes the process smooth and fun.
First, collect all your ingredients and tools in one spot. This saves time and keeps you focused on cooking. For these treats, being organized is crucial.
- Measure all ingredients precisely
- Set out measuring cups and spoons
- Prepare a 9×13 inch baking dish
- Line the dish with parchment paper
Pro tip: Grease your baking pan with butter or cooking spray to ensure easy removal of your no-bake desserts.
“Preparation is half the battle in creating perfect treats!” – Baking Enthusiast
Your workspace should be clean, dry, and clutter-free. Clear your countertop and have all utensils within reach. A tidy kitchen helps make delicious chocolate peanut butter rice krispie treats that will wow everyone.
Make sure you have these key tools ready:
- Large mixing bowl
- Rubber spatula
- Measuring cups
- Baking dish
- Parchment paper
By taking these steps, you’ll make a stress-free space for making your treats. The most important thing is to work efficiently and have fun!
The Art of Melting Chocolate and Peanut Butter
Making chocolate peanut butter rice krispie squares is all about melting ingredients right. The right way can turn your treats from a mess to a masterpiece.
Melting chocolate and peanut butter is not as easy as it sounds. It takes careful attention and patience. You want your treats to be smooth and shiny, impressing everyone who tries them.
Double Boiler Method for Perfect Melting
The double boiler method is the best way to melt ingredients gently. Here’s how to do it:
- Fill a bottom pot with 1-2 inches of water
- Place a heat-safe bowl on top, ensuring it doesn’t touch water
- Add chocolate and peanut butter to the top bowl
- Stir continuously over low heat
- Remove from heat when ingredients are 75% melted
Microwave Melting Technique
For quick treats, the microwave is a great choice:
- Use microwave-safe bowl
- Set power to 50%
- Heat in 15-20 second intervals
- Stir between each heating cycle
- Stop when ingredients are smooth
Preventing Chocolate from Seizing
To keep your treats perfect, avoid these mistakes:
- Eliminate all moisture near chocolate
- Use dry utensils
- Maintain low, consistent temperatures
- Stir gently and frequently
- Remove from heat before fully melted
Pro tip: Patience is key when creating these delectable peanut butter treats. Rushing can lead to burnt or clumpy chocolate.
Step-by-Step Guide to Making Chocolate Peanut Butter Rice Krispie Treats
Making chocolate peanut butter rice krispie treats is simple. They’re great for quick, fun desserts that kids and adults love. Here’s how to make them in easy steps for sweet success.
- Prepare Your Ingredients: Get all your ingredients ready. You’ll need marshmallows, butter, chocolate, peanut butter, and crispy rice cereal.
- Melt the Base: In a big pot, melt butter on low heat. Add marshmallows and stir until smooth.
- Chocolate and Peanut Butter Magic: Take it off the heat and mix in melted chocolate and peanut butter. Stir until it’s creamy.
- Add the Crunch: Pour in rice krispies cereal. Fold until each piece is coated with the chocolate-peanut butter mix.
- Press and Shape: Put the mix in a pan. Use a spatula or wet hands to press it down and shape it.
The key to great no-bake desserts is quick mixing and avoiding overheating. Your treats should be gooey and full of chocolate and peanut butter flavor.
Let the treats cool and set for 30 minutes at room temperature. Cut into squares and serve. These treats will be gone in no time!
Tips for Perfect Texture and Consistency
Making the best cereal treats needs focus on texture and technique. Chocolate peanut butter rice krispie treats can be challenging. But, with the right steps, you’ll get them just right every time.
The key to great treats is finding the perfect mix of crispy and chewy. Success depends on two main things: the cereal-to-mixture ratio and how you press them.
Mastering the Cereal-to-Mixture Ratio
Finding the right balance is key for texture. Too much cereal makes treats dry and crumbly. Too little makes them too sticky. Here are some tips:
- Use 6 cups of Rice Krispies for a standard batch
- Measure ingredients precisely
- Adjust slightly based on desired consistency
Precision Pressing Techniques
Proper pressing makes treats even and compact without being too dense. Here are some expert tips:
- Use slightly dampened fingers to prevent sticking
- Press gently – do not compress too firmly
- Create an even layer about 1-inch thick
| Pressing Technique | Result |
|---|---|
| Light, even pressure | Perfectly textured treats |
| Excessive pressing | Dense, hard squares |
| Minimal pressing | Crumbly, falling-apart treats |
Practice makes perfect with these tasty cereal treats. Your patience will pay off with smooth, delicious squares that everyone will enjoy.
Storage and Shelf Life Guidelines
Keeping your treats fresh is key. Chocolate peanut butter rice krispie treats are special. They need care to stay tasty and soft.
For short-term storage, follow these guidelines:
- Store in an airtight container at room temperature
- Keep away from direct sunlight and heat sources
- Place wax paper between layers to prevent sticking
- Consume within 5-7 days for optimal freshness
Refrigeration can extend the life of your chocolate peanut butter rice krispie treats. When storing in the refrigerator:
- Wrap treats individually in plastic wrap
- Place in a sealed container
- Refrigerate for up to 10 days
- Let treats sit at room temperature for 10-15 minutes before serving
Freezing is an excellent option for long-term preservation of these sweet snacks:
- Wrap treats tightly in plastic wrap
- Place in a freezer-safe container or zip-lock bag
- Add parchment paper between layers
- Freeze for up to 3 months
- Thaw overnight in the refrigerator
Pro tip: Avoid storing your chocolate peanut butter rice krispie treats near strong-smelling foods. They can pick up other flavors fast.
Creative Variations and Toppings
Make your peanut butter treats special by trying new things. You can turn your chocolate peanut butter rice krispies into something amazing. Add your own twist with unique flavors and textures.
Alternative Nut Butter Exploration
Try new nut butters to spice up your recipe. Peanut butter is great, but you can also use:
- Almond butter for a subtle, nutty flavor
- Cashew butter for a creamy, mild taste
- Sunflower seed butter for nut-free options
- Pistachio butter for a gourmet twist
Decorative Finishing Touches
Add a wow factor to your rice krispies treats with these ideas:
- Sprinkle coarse sea salt for a sweet-savory contrast
- Dust with shredded coconut for tropical flair
- Top with chopped nuts like pecans or air-fryer roasted peanuts
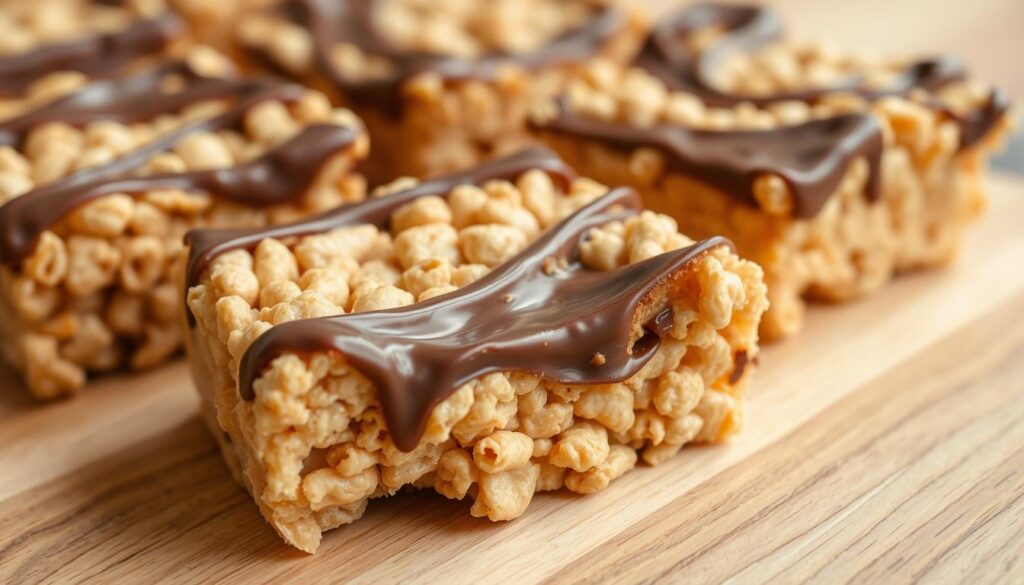
- Drizzle additional melted chocolate for extra decadence
Remember, creativity is key to making your treats unforgettable. Feel free to get creative with toppings to make your own special dessert!
Conclusion
Creating no-bake desserts like chocolate peanut butter rice krispie treats is a joy. They are not just sweet snacks. They are a chance to be creative and make everyone happy.
This recipe shows that making special treats is easy. You don’t need to be a pro in the kitchen. With simple ingredients and steps, you can make amazing desserts that everyone loves. These treats are perfect for any occasion, bringing joy with little effort.
This recipe is also very flexible. You can try different nut butters, chocolates, or toppings. Be creative and share your treats with others. Each batch is a story of fun and flavor.
The key ingredient in any recipe is love. So, enjoy making your chocolate peanut butter rice krispie treats. Have fun and relish every bite of your homemade treats.